This document contains a collection of various Shiny tricks that I commonly use or that I know many people ask about. Each link contains a complete functional Shiny app that demonstrates how to perform a non trivial task in Shiny. The complete up-to-date list of tips, along with all the code, is on GitHub.
Since I first learned about Shiny 2 years ago, I was always looking for ways to push Shiny to its limits and I enjoyed finding ways to work around common problems people were having (the harder the problem, the better!). I’ve built many Shiny apps over these 2 years, both for myself and as a contractor for other people/companies, and throughout this time I developed a handy list of Shiny design patterns and tricks, some of which I present here.
Apart from providing these tips for free, I am also a Shiny consultant - if you need help with anything Shiny or R, feel free to contact me.
Table of contents
- Prereq: How to hide/show something in Shiny? How to disable an input? How do I reset an input?
- Easy
- Show a spinning “loading” animation while a plot is recalculating (code)
- Hide a tab (code)
- Hide/show shinydashboard sidebar programmatically (code)
- Loading screen (code)
- Automatically stop a Shiny app when closing the browser tab (code)
- Close the window (and stop the app) with a button click (code)
- Select input with more breathing room (code)
- Select input with groupings of options (code)
- Getting the value of an object in a running Shiny app without access to a debugger (code)
- Adding text (or inputs) to the navigation bar in a navbarPage (code)
- Intermediate
- Pre-populate Shiny inputs when an app loads based on URL parameters (code)
- Split app code across multiple files (when codebase is large) (code)
- Use a variable from the server in a UI
conditionalPanel()(code) - Show user a generic error message when a Shiny error occurs in an output (code)
- Show a function’s messages and warnings to the user (code)
- Fix filenames of files uploaded via fileInput() (code)
- Shiny app with sequence of pages (code)
- Toggle a UI element (alternate between show/hide) with a button (code)
- Send a message from R to JavaScript (code)
- Send a message from JavaScript to R (code)
- Send a message from JavaScript to R - force repetitive messages to get sent (code)
- Press the Enter key to simulate a button press (code)
- Run arbitrary code live in Shiny - great for testing during development (code)
- Advanced
- Serve files (images/text files/etc) instead of webpages from a Shiny app (code)
- Update multiple Shiny inputs without knowing input type (code)
- “Busy…” / “Done!” / “Error” feedback after pressing a button (code)
- Simple AJAX system for Shiny apps (JS -> R -> JS communication) (code)
- Use a custom function to convert the JavaScript data into an R object (code)
- Navigation in a Shiny app (forward/backwards in history) (code)
- Sharing images on Facebook (code)
- Facebook login through JavaScript in Shiny (code)
- Multiple scrollspy on same page - basic (code)
- Multiple scrollspy on same page - advanced (code)
- Very advanced
Prereq: How to hide/show something in Shiny? How to disable an input? How do I reset an input?
A few very common questions in Shiny are “how do I hide/show something”, “how do I disable an input”, and “how do I reset an input”. Many of the code samples in this document also rely on being able to do these things, so I wanted to start by saying that I will be using the shinyjs package to do all that. (Yes, I know it looks like I’m shamelessly advertising shinyjs by saying this… but it is going to be useful for many concepts here)
Show a spinning "loading" animation while a plot is recalculating
When a Shiny plot is recalculating, the plot gets grayed out. This app shows how you can add a spinner wheel on top of the plot while it is recalculating, to make it clear to the user that the plot is reloading. There can be many different ways to achieve a similar result using different combinations of HTML/CSS, this example is just the simplest one I came up with. Update: There is now a package shinycssloaders to do this easier!

Hide a tab
This app demonstrates how shinyjs can be used to hide/show a specific tab in a tabsetPanel. In order to use this trick, the tabsetPanel must have an id. Using this id and the value of the specific tab you want to hide/show, you can call shinyjs::hide()/shinyjs::show()/shinyjs::toggle().
Hide/show shinydashboard sidebar programmatically
A common question regarding shinydashboard is how to programmatically hide/show the sidebar. This can very easily be done using the shinyjs package, as demonstrated here.
Loading screen
This simple app shows how to add a “Loading…” screen overlaying the main app while the app’s server is initializing. The main idea is to include an overlay element that covers the entire app (using CSS), hide the main app’s UI, and at the end of the server function show the UI and hide the overlay.

Automatically stop a Shiny app when closing the browser tab
When developing a Shiny app and running the app in the browser (as opposed to inside the RStudio Viewer), it can be annoying that when you close the browser window, the app is still running and you need to manually press “Esc” to kill it. By adding a single line to the server code session$onSessionEnded(stopApp), a Shiny app will automatically stop running whenever the browser tab (or any session) is closed.
Close the window (and stop the app) with a button click
This simple example shows how you can have a button that, when clicked, will close the current browser tab and stop the running Shiny app (you can choose to do only one of these two actions).
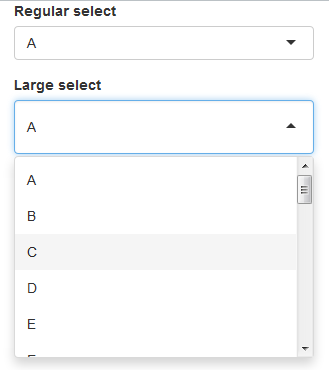
Select input with more breathing room
One common CSS question in Shiny is how to make the select input dropdown menu have some more whitespace. It’s actually very easy to do with just two CSS rules, as demonstrated in this example.
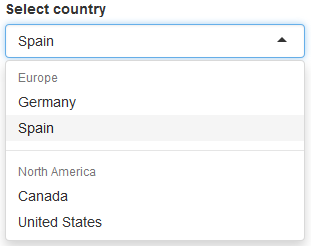
Select input with groupings of options
This isn’t really a trick as much as an undocumented feature in Shiny that not many people know about. Usually when people write dropdowns in Shiny, all the options are just provided as one long list. But it is possible to have groups of items, and it’s very easy to do.
Getting the value of an object in a running Shiny app without access to a debugger
Sometimes you may need to know the value of some variable/function call in a Shiny app when you don’t have easy access to debugging tools. For example, suppose you deploy your shiny app on shinyapps.io and it’s running into a weird error there. You’re sure that it’s because one of the packages on the shinyapps.io server is not the version that you expect, but you want to make sure that your suspicion is correct. It’s a bit difficult to debug on shinyapps.io (one thing you could do is try to use the log files), but there’s a quick and easy way to see any value in a Shiny app in real-time.
Adding text (or inputs) to the navigation bar in a navbarPage
Traditionally, a navbarPage() only accepts tabs and menu items inside of it. Even though the Bootstrap navbar (which is what Shiny uses) supports adding text and input widgets into the navbar, Shiny doesn’t have support for that. This app shows you how to very easily achieve that.
Pre-populate Shiny inputs when an app loads based on URL parameters
This simple app demonstrates how you can fill out certain input fields when a Shiny app loads based on URL parameters.
Split app code across multiple files (when codebase is large)
When creating Shiny apps with a lot of code and a complex UI, it can sometimes get very messy and difficult to maintain your code when it’s all in one file. What you can do instead is have one “main” UI and “main” server and split your UI and server code into multiple files. This can make your code much more manageable and easier to develop when it grows large. You can split the code however you want, but I usually like to split it logically: for example, if my app has 4 tabs then the UI for each tab would be in its own file and the server code for each tab would be in its own file. The example code here shows how to separate the code of an app with two tabs into 2 UI files and 2 server files (one for each tab). Update: Shiny now has the concept of modules, which is another recommended approach for handling large code bases. Modules are a bit more complex but also much more powerful.
Use a variable from the server in a UI `conditionalPanel()`
When using a conditional panel in the UI, the condition is usually an expression that uses an input value. But what happens when you want to use a conditional panel with a more complex condition that is not necessarily directly related to an input field? This example shows how to define an output variable in the server code that you can use in the UI. An alternative approach is to use the show() and hide() functions from the shinyjs package.
Show user a generic error message when a Shiny error occurs in an output
When a Shiny output encounters an error, the exact error message will be shown to the user in place of the output. This is generally a good feature because it’s easier to debug when you know the exact error. But sometimes this is undesireable if you want to keep the specifics of what happened unknown to the user, and you prefer to just show the user a generic “Some error occurred; please contact us” message. This may sound counter intuitive, but you can actually do this with a tiny bit of CSS, as this example shows.
Show a function's messages and warnings to the user
Sometimes when you call a function, it may print out some messages and/or warnings to the console. If you want to be able to relay these warnings/messages to your app in real time, you can combine withCallingHandlers with the html function from shinyjs.
(Originally developed as an answer on StackOverflow)
Fix filenames of files uploaded via fileInput()
When selecting files using a fileInput(), the filenames of the selected files are not retained. This is not usually a problem because usually you only care about the contents of a file and not its name. But sometimes you may actually need to know the original name of each selected file. This example shows how to write a simple function fixUploadedFilesNames() to rename uploaded files back to their original names.
Shiny app with sequence of pages
This app demonstrates how to write a Shiny app that has a sequence of different pages, where the user can navigate to the next/previous page. This can be useful in many scenarios that involve a multi-step process. This behaviour can also be achieved by simply using tabs, but when using tabs the user can freely move from any tab to any other tab, while this approach restricts the user to only move to the previous/next step, and can also control when the user can move on to the next page.
Toggle a UI element (alternate between show/hide) with a button
Sometimes you want to toggle a section of the UI every time a button is clicked. This app shows how to achieve very basic toggle functionality using conditionalPanel(). If you want anything more advanced, you can use the toggle() function from the shinyjs package.
Send a message from R to JavaScript
While Shiny is very powerful, there are many things that cannot be achieved in R and must be done in JavaScript. When including JavaScript code in a Shiny app, you sometimes need to send a message or a value from R to the JavaScript layer. This example how this is done.
Send a message from JavaScript to R
In some shiny applications you may want to send a value from JavaScript to the R server. This can be useful in a variety of applications, for example if you want to capture a mouse click or a keyboard press of the user and tell R about it. This example shows how this is done.
Send a message from JavaScript to R - force repetitive messages to get sent
When you send a message from JS to R with the exact same value multiple times in a row, only the first time actually gets sent to Shiny. This can often be problematic, and this example shows a fairly simple workaround.
Press the Enter key to simulate a button press
This is a simple app with a tiny bit of JavaScript that shows you how to cause an Enter key press inside an input to trigger a click on a button.
Run arbitrary code live in Shiny - great for testing during development
NOTE: This is now part of the shinyjs package – read the documentation for ?shinyjs::runcode
When I develop Shiny apps or packages for Shiny, I often find myself wanting to be able to run R code on-demand while the app is running. Outside of Shiny, in regular R programming, we have the R console where we can run any command at any point in time, but in Shiny we don’t really have that. So while developing, I often add a text input that lets me type any R code into it and then run it. This is very useful for testing.
Serve files (images/text files/etc) instead of webpages from a Shiny app
It is possible to serve an image or another file directly from your Shiny app instead of a webpage. The method shown here is a simple proof-of-concept of how to achieve this functionality. It also supports passing GET parameters to the file-generating logic so that the file can be parameterized.
Update multiple Shiny inputs without knowing input type
Shiny allows you to update an input element only if you know the type of input. Furthermore, Shiny only allows you to update input elements one by one. This Shiny app shows how you can update an input only using its ID and without knowing its type, and how to update multiple inputs together.
"Busy..." / "Done!" / "Error" feedback after pressing a button
When the user clicks on a button, it usually results in some R code being run. Sometimes the resulting code is short and quick and the user doesn’t even notice any delay, but sometimes the button click initialiates some long process or computation that can take more than 1 second to complete. In those cases, it might be a bit confusing to the user if there is no immediate feedback notifying that the action is being performed. For example, if the user clicked a button to load data from a database and it takes 3 seconds to connect to the database, it can be useful to show a “Connecting…” and then a “Done!” (or “Error”) message, instead of just letting the user wait without seeing any message. Of course when the wait time is only 2-3 seconds it’s not a big deal, but you can imagine that for a 20-second process, the user might think that something went wrong if there is no feedback. This example shows how to add some immediate feedback to the user after a button is clicked, including disabling/enabling the button and showing a success/error message when appropriate.
Simple AJAX system for Shiny apps (JS -> R -> JS communication)
Sometimes it’s useful to be able to call an R function from JavaScript and use the return value from R back in JavaScript. This sort of communication is usually done with AJAX in JavaScript. This app shows how to implement a simple and ultra lightweight AJAX-like system in Shiny, to be able to call functions in R.
Use a custom function to convert the JavaScript data into an R object
When using Shiny.onInputChange(name, data) (as described here), you are passing in a JavaScript object (data) and expect it to get converted to an R object (input$name). This conversion happens by serializing and deserializing the data to and from JSON. Usually input$name will look exactly like you’d expect it to, but it is possible for the conversion process to not do exactly what you want. Alternatively, you may just want to alter the data slightly in R before presenting it to Shiny.
Navigation in a Shiny app (forward/backwards in history)
Sometimes it’s nice to be able to support navigation within a Shiny app, especially when there are multiple tabs or some other form of “multiple pages” in a Shiny app. Since Shiny apps are a single page, the browser nagivation buttons (previous/next page) don’t work when “navigating” within a Shiny app. You also can’t bookmark a certain “page” in a Shiny app - every time you go to an app, you will be shown the initial state of the app. This app shows how to implement basic navigation in Shiny apps.
Sharing images on Facebook
There are two ways to share images on Facebook: either using an image URL and a popup dialog, or by programmatically supplying the Facebook API with a base64 encoded image. This example shows both.
Facebook login through JavaScript in Shiny
This app shows how you can use the AJAX-like system in Shiny to authorize a user using Facebook’s JavaScript library and pass the user’s information to R for processing.
Multiple scrollspy on same page - basic
The Bootstrap scrollspy plugin does not support multiple scrollspy objects per page. This Shiny app demonstrates how to support scrollspy on multiple tabs by having one common scrollspy control that gets updated via JavaScript whenever a tab is changed to reflect the contents of the new tab.
Multiple scrollspy on same page - advanced
The Bootstrap scrollspy plugin does not support multiple scrollspy objects per page. This Shiny app demonstrates how to support scrollspy on multiple tabs by allowing each tab to have its own independent scrollspy control and using JavaScript to ensure only the scrollspy on the current tab is activated.
Create a reactive trigger
A reactive trigger can be used when you want to be able to explicitly trigger a reactive expression. You can think of it as being similar to an action button, except instead of clicking on a button to trigger an expression, you can programatically cause the trigger. This concept and code was created by Joe Cheng (author of shiny).
Create a reactive value that only triggers when its value changes
If you understand shiny and reactivity well, you will know that a reactive expression gets re-run whenever any of its reactive dependencies are invalidated. This is generally the desired behaviour, but there is one caveat that comes up occassionally: even if the underlying value of the reactive dependency hasn’t changed, it can still be considered “invalidated”. This can mean that a reactive expression will run again with exactly the same values because its dependencies have not changed, even though they’re invalidated. Joe Cheng (author of shiny) has a solution for this.
Create a cancellable long-running task
In shiny (or R in general), when you start running a function, you generally cannot do anything else until that function completes. This means that if the user of a shiny app does something that results in a 2-minute calculation, the entire app becomes unusable and the user has to wait 2 minutes before they can interact with the app again. This has been a problem for some people, and the shiny team is currently looking into providing a solution for this. In the meantime, Joe Cheng (author of Shiny) came up with a nice workaroud. His solution will likely not work on Windows and it is not a robust fool-proof solution, but itcan get the job done.