If you want help setting up your Shiny Server, a 1-on-1 walk-through or tutorial, or just general consultation about using Shiny Server, I’m available for hire.
If you’ve always wanted to have an RStudio Server of your own so that you can access R from anywhere, or your own Shiny Server to host your awesome shiny apps or Rmarkdown documents, DigitalOcean (DO) can help you get there easily. For example, take a look at my Shiny Server to see how useful this can be.
DigitalOcean provides virtual private servers (they call each server a droplet), which means that you can pay $5/month to have your own server “in the cloud” that you can access from anywhere and host anything on. Check out my DO droplet to see it in action! Use my referral link to get $10 in credits, which is enough to give you a private server for your first 2 months.
I only found out about DO a couple of months ago when I asked my supervisor, Jenny Bryan, if there was a way for me to do some R-ing when I’m away from my machine. She told me that she doesn’t have a solution for me, but that I should check out DigitalOcean, so I did. And it turns out that it’s very convenient for hosting my own RStudio Server and anything else I’d like to host, and very affordable even for my student self. :) (2017 update: I’m not longer a student, but I do still love the pricing of this service!)
This post will cover how to set up a machine from scratch, set up R, RStudio Server, Shiny Server, and a few other helpful features on a brand new DO droplet (remember: droplet = your machine in the cloud). The tutorial might seem lengthy, but it’s actually very simple, I’m just breaking up every step into very fine details. Based on feedback from others, it should take about 30 minutes to go through this post and get everything set up.
Table of contents
- Step 1: Sign up to DigitalOcean
- Step 2: Create a new droplet
- Step 3: Log in to your very own shiny new server
- Step 4: Ensure you don’t shoot yourself in the foot
- Step 5: See your droplet in a browser
- Step 6: Install R
- Step 7: Install RStudio Server
- Step 8: Install Shiny Server
- Step 9: Make pretty URLs for RStudio Server and Shiny Server
- Step 10: Custom domain name
- Updates
- Resources
- Comments
Step 1: Sign up to DigitalOcean
Go to DigitalOcean (use this referral link to get 2 months free!) and sign up. Registration is quick and painless, but in order to verify your account (and to get your $10) you have to provide credit card details. After signing up, if you go to your Billing page you should see your $10 credit.
Step 2: Create a new droplet
Now let’s claim one of DO’s machines as our own! It’s so simple that you definitely don’t need my instructions, just click on the big green “Create” button -> “Droplets” -> and choose your settings. I chose the smallest/weakest machine ($5/month plan) and it’s good enough for me.
I chose San Francisco for region because it’s the closest to me, though it really wouldn’t make much of a noticeable difference where the server is located. For operating system, I chose to go with the default Ubuntu 20.04 x64. If you know what SSH keys are (you can learn here), then I recommend you add an SSH key at the last step if you know how to do that. If not, just proceed without an SSH key.
Note: all subsequent steps assume that you are also using the weakest server possible with Ubuntu 20.04 x64. If you chose different settings, the general instructions will still apply but some of the specific commands/URLs might need to change.
Even though you probably don’t need it, here’s a short GIF showing how I create a new droplet:

Step 3: Log in to your very own shiny new server
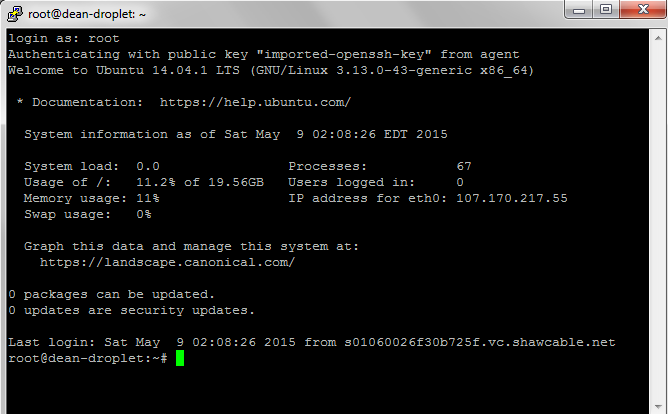
Once the droplet is ready (can take a few minutes), you’ll be redirected to a page that shows you information about the new droplet, including its IP. From now on, I’ll use the random IP address 123.456.1.2 for the rest of this post, but remember to always substitute your actual droplet’s IP with this one.
One option to log into your droplet is through the “Access” tab on the droplet’s page, but it’s incredibly slow and ugly, so I prefer logging in on my own machine. If you’re on a unix machine, you can just use ssh 123.456.1.2. I’m on Windows, so I use PuTTY to SSH (“login”) into other machines. Use the IP that you see on the page, with the username root. If you used an SSH key then you don’t need to provide a password; otherwise, a password was sent to your email. The first time you log in, you may be asked to change the default password.
You should be greeted with a welcome message and some stats about the server that look like this:
Step 4: Ensure you don’t shoot yourself in the foot
The first thing I like to do is add a non-root user so that we won’t accidentally do something stupid as “root”. Let’s add a user named “dean” and give him admin power. You will be asked to give some information for this new user.
adduser dean
gpasswd -a dean sudo
From now on I will generally log into this server as “dean” instead of “root”. If I’ll need to run any commands requiring admin abilities, I just have to prepend the command with sudo. Let’s say goodbye to “root” and switch to “dean”.
su - dean
Now that we’re no longer logged in as the administrator, you may be asked for your password sometimes when trying to run a command.
Step 5: See your droplet in a browser
Right now if you try to visit http://123.456.1.2 in a browser, you’ll get a “webpage not available error”. Let’s make our private server serve a webpage there instead, as a nice visual reward for getting this far. Install nginx:
sudo apt-get update
sudo apt-get -y install nginx
Now if you visit http://123.456.1.2, you should see a welcome message to nginx. Instant gratification!
Quick nginx references
The default file that is served is located at /var/www/html/index.nginx-debian.html, so if you want to change what that webpage is showing, just edit that file with sudo nano /var/www/html/index.nginx-debian.html. For example, I just put a bit of text redirecting to other pages in my index page. The configuration file is located at /etc/nginx/nginx.conf.
When you edit an HTML file, you will be able to see the changes immediately when you refresh the page, but if you make configuration changes, you need to restart nginx. In the future, you can stop/start/restart nginx with
sudo service nginx stop
sudo service nginx start
sudo service nginx restart
Tip: The default nginx settings only allow file uploads of 1MB. If your shiny apps use fileInput() and you want to be able to upload larger files, you’ll need to set the client_max_body_size nginx parameter. The details are out of scope for this tutorial, but just knowing about this parameter might save you many hours of Googling/debugging one day!
Step 6: Install R
To ensure we get the most recent version of R, we need to first add focal (the release name for Ubuntu 20.04) to our sources.list:
sudo sh -c 'echo "deb http://cran.rstudio.com/bin/linux/ubuntu focal-cran40/" >> /etc/apt/sources.list'
Now add the public keys:
gpg --keyserver keyserver.ubuntu.com --recv-key E298A3A825C0D65DFD57CBB651716619E084DAB9
gpg -a --export E298A3A825C0D65DFD57CBB651716619E084DAB9 | sudo apt-key add -
Now we’re ready to install R
sudo apt-get update
sudo apt-get -y install r-base
You should now be able to run R and hopefully be greeted with a message containing the latest R version.
R
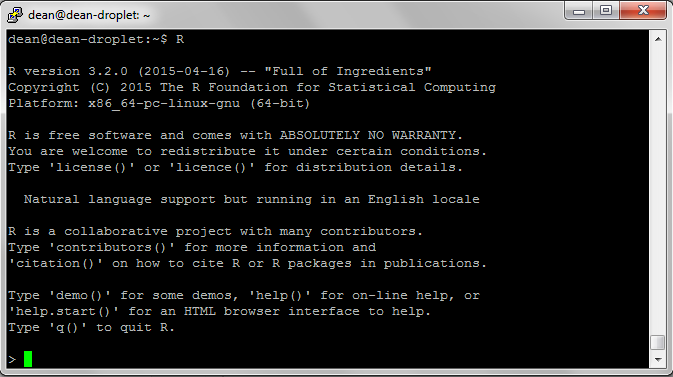
Now you need to quit R (quit()) because there are a couple small things to adjust on the server so that R will work well.
If you also chose the weakest machine like I did, many packages won’t be able to install because of not enough memory. We need to add 1GB of swap space:
sudo /bin/dd if=/dev/zero of=/var/swap.1 bs=1M count=1024
sudo /sbin/mkswap /var/swap.1
sudo /sbin/swapon /var/swap.1
sudo sh -c 'echo "/var/swap.1 swap swap defaults 0 0 " >> /etc/fstab'
Now installing most packages will work. But before installing any package, I always like having devtools available so that I can install R packages that are on GitHub. devtools will currently not be able to get installed because it has a few dependencies. Let’s install those dependencies:
sudo apt-get -y install libcurl4-gnutls-dev libxml2-dev libssl-dev
Ok, now we can start installing R packages, both from CRAN and from GitHub!
sudo su - -c "R -e \"install.packages('devtools', repos='http://cran.rstudio.com/')\""
sudo su - -c "R -e \"devtools::install_github('daattali/shinyjs')\""
Feel free to play around with R now.
Note 6.1: Important note re: installing R packages
Note that instead of launching R and installing the packages from R, I’m doing it from the terminal with sudo su - -c "R ...". Why? Because if you log into R and install packages, by default they will be installed in your personal library and will only be accessible to the current user (dean in this case). By running the command the way I do above, it installs the packages as the root user, which means the packages will be installed in a global library and will be available to all users.
As a demonstration, launch R (simply run R) and run .libPaths(). This will show you all the locations where R will search for a package, and the first one is where a new package will get installed. You’ll probably notice that the first entry, where packages will get installed, is a path under the current user’s home (for me it’s /home/dean/R/x86_64-pc-linux-gnu-library/3.2). From now on, whenever you want to install a package for the whole system, you should either log in as root and intall the package, or use the above command. To install an R package for just one user, it’s ok to proceed as normal and just install the package when you’re logged in as the intended user.
Step 7: Install RStudio Server
Great, R is working, but RStudio has become such an integral part of our lives that we can’t do any R without it!
Let’s install some pre-requisites:
sudo apt-get -y install gdebi-core
Download the latest RStudio Server — consult RStudio Downloads page to get the URL for the latest version. Then install the file you downloaded. These next two lines are using the latest version as of writing this post.
wget https://download2.rstudio.org/server/bionic/amd64/rstudio-server-1.3.1093-amd64.deb
sudo gdebi rstudio-server-1.3.1093-amd64.deb
Done! By default, RStudio uses port 8787, so to access RStudio go to http://123.456.1.2:8787 and you should be greeted with an RStudio login page. (If you forgot what your droplet’s IP is, you can find out by running hostname -I)

You can log in to RStudio with any user/password that are available on the droplet. For example, I would log in with username dean and my password. If you want to let your friend Joe have access to your RStudio, you can create a new user for them with adduser joe.
Go ahead and play around in RStudio a bit to make sure it works fine. I usually like to try out a ggplot2 function, to ensure that graphics are working properly.
Step 8: Install Shiny Server
You can safely skip this step if you don’t use Shiny and aren’t interested in being able to host Shiny apps yourself. But don’t forget that Shiny Server can also be used to host Rmarkdown files, not just shiny apps. This means that even if you don’t develop shiny apps you might still have a use for Shiny Server if you want to host interactive Rmarkdown documents.
To install Shiny Server, first install the shiny package:
sudo su - -c "R -e \"install.packages('shiny', repos='http://cran.rstudio.com/')\""
(Note again that we’re installing shiny in a way that will make it available to all users, as I explained above).
Just like when we installed RStudio, again we need to get the URL of the latest Shiny Server from the Shiny Server downloads page, download the file, and then install it. These are the two commands using the version that is most up-to-date right now:
wget https://download3.rstudio.org/ubuntu-14.04/x86_64/shiny-server-1.5.15.953-amd64.deb
sudo gdebi shiny-server-1.5.15.953-amd64.deb
Shiny Server is now installed and running. Assuming there were no problems, if you go to http://123.456.1.2:3838/ you should see Shiny Server’s default homepage, which includes some instructions and two Shiny apps:
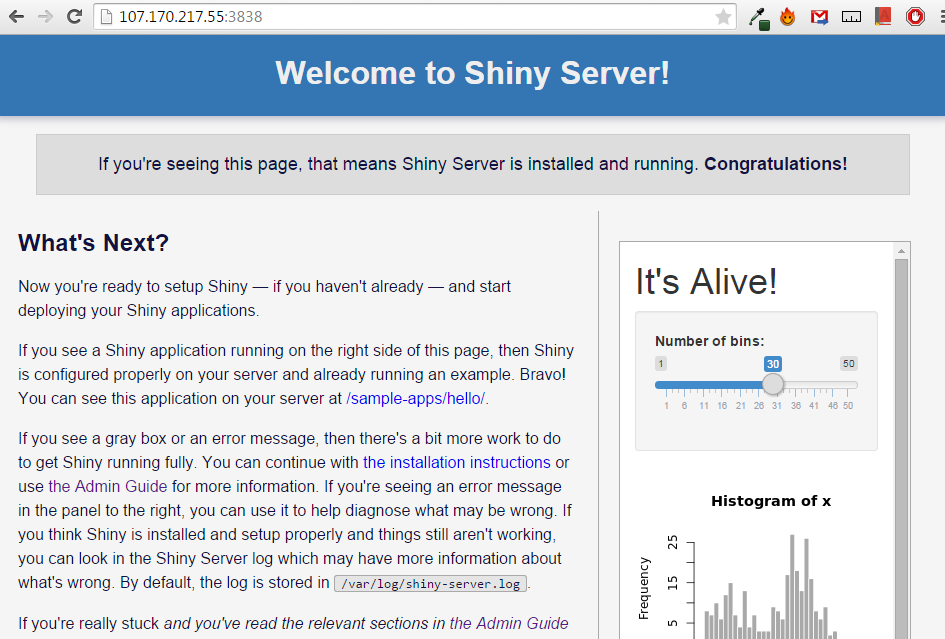
If you see an error on the bottom Shiny app, it’s probably because you don’t have the rmarkdown R package installed (the instructions on the default Shiny Server page mention this). After installing rmarkdown in R, the bottom Shiny app should work as well. Don’t forget to install rmarkdown so that it will be available to all users as described above. I suggest you read through the instructions page at http://123.456.1.2:3838/.
Quick Shiny Server references:
- Shiny Server log is at
/var/log/shiny-server.log. - The default Shiny Server homepage you’re seeing is located at
/srv/shiny-server/index.html- you can edit it or remove it. - Any Shiny app directory that you place under
/srv/shiny-server/will be served as a Shiny app. For example, there is a default app at/srv/shiny-server/sample-apps/hello/, which means you can run the app by going tohttp://123.456.1.2:3838/sample-apps/hello/. - The config file for Shiny Server is at
/etc/shiny-server/shiny-server.conf. - To reload the server after editing the config, use
sudo service shiny-server restart. - When hosting an Rmarkdown file, name the file
index.rmdand addruntime: shinyto the document’s frontmatter.
Important! If you look in the config file, you will see that by default, apps are run as user shiny. It’s important to understand which user is running an app because things like file permissions and personal R libraries will be different for each user and it might cause you some headaches (or many days of headaches in my experience) until you realize it’s because the app should not be run as shiny. Just keep that in mind.
The fact that apps run as the user shiny means that any package required in a shiny app needs to be either in the global library or in shiny’s library. As I mentioned above, you might need to install R packages in a special way to make sure the shiny user can access them.
Tip: During app development, I recommend adding the lines preserve_logs true; and sanitize_errors false; to the shiny server configuration file (and then restarting the server). This will make sure log files will always be saved and informative error messages are printed, which makes debugging easier (you may want to reverse these settings in production).
Step 8.1: Set up proper user permissions on Shiny Server
As I just mentioned, dealing with which user is running an app and user permissions can be a bit annoying. It took me a very long time to figure our how to set up the users in a way that works well for me, and this is the setup I came up with. I’m not saying it’s necessarily the most correct way to work, but it works for me and has worked for hundreds of others who have followed this article. Feel free to do the same.
Currently, assuming you’re logged in as user dean, when you create a folder in the Shiny Server folder (/srv/shiny-server/), dean will be considered the only owner of that folder, and nobody else (except root) will be able to write files there. Why is this a problem? It means that if a Shiny app is trying to write a file to the filesystem, the app will crash because shiny user does not have those permissions! One option is to add run_as dean; to the shiny server config, but I don’t like that because then when I want to see which user is using up the server’s resources, I won’t be able to differentiate between a shiny app running under my name vs me running R code myself.
So my solution is to create a user group called shiny-apps and add both dean and shiny users to it. Then I’ll make sure that the whole /srv/shiny-server folder has read+write permissions for this group. (Again, disclaimer: I’m not a sysadmin so I’m learning all this as I go. Don’t treat this as a work of god).
sudo groupadd shiny-apps
sudo usermod -aG shiny-apps dean
sudo usermod -aG shiny-apps shiny
cd /srv/shiny-server
sudo chown -R dean:shiny-apps .
sudo chmod g+w .
sudo chmod g+s .
Now both dean and shiny will have access to any new or existing files under /srv/shiny-server. I like it because now I can develop an app from my RStuio Server (logged in as dean), be able to run it through RStudio (as dean), and also be able to run it via my Shiny Server (as shiny).
Step 8.2: Populate Shiny Server with Shiny apps using a git repository
As mentioned above, any Shiny app you place under /srv/shiny-server/ will be automatically served as a Shiny app. But how do you get shiny apps into there in the first place? If you’re creating a new app, you can just log into your RStudio Server and develop your shiny app from there, and just save the app under /srv/shiny-server/.
But what if you want to bring into your server an app you already have on your own computer? One option is to directly transfer files using something like FileZilla or the scp command. The moment a shiny app directory is transferred to your droplet, the corresponding app will be available to use on the web right away. Another approach is to use git. If you don’t know what git is, that’s outside the scope of this article, so either look it up and come back here or just use FileZilla :)
The main idea is to have the /srv/shiny-server/ folder be a git repository so that you can push to this repository from your personal computer. Whenever you do a git pull on your droplet, it will update and grab the new apps you added. That’s how I set up my own shiny server, you can take a look at my shiny server repository on GitHub and fork it if you’d like a good starting point.
The first step is to install git and tell git who you are (use your email address and your name in the last 2 commands)
sudo apt-get -y install git
git config --global user.email "you@example.com"
git config --global user.name "Your Name"
Now let’s make the /srv/shiny-server/ directory a git repository.
cd /srv/shiny-server
git init
Next we will create a GitHub repository, so go to GitHub and add a new repository named shiny-server.
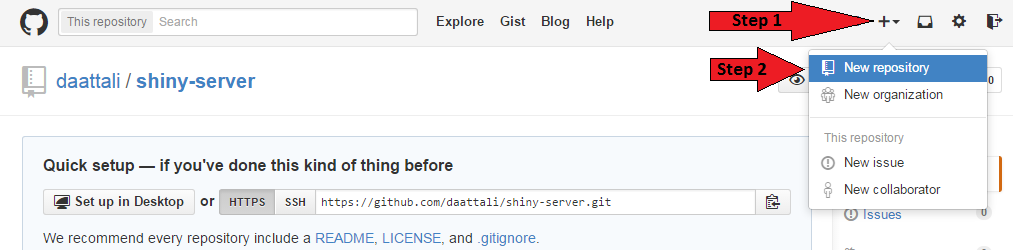
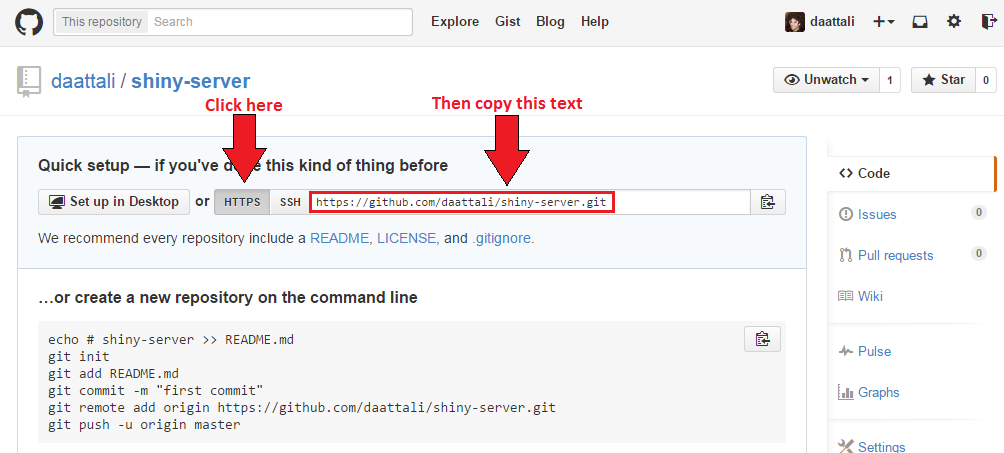
Now we need to grab the URL of the repository from GitHub, so on the new page you were redirected to, click on “HTTPS” and then copy the URL to its right, as shown in the image below:
Now we need to make the connection between the git repository we made on our droplet and the one we just created, and then add all the files that are currently in /srv/shiny-server/ to this repository. Be sure to replace the URL in the first command with the URL that you copied from your repository.
git remote add origin https://github.com/daattali/shiny-server.git
git add .
git commit -m "Initial commit"
git push -u origin master
If you now refresh the GitHub page, you should see the files that were added from the droplet.
Now that git is set up, you can add shiny apps to this repository (assuming you know basic git usage). Whenever you add a new shiny app or edit the index page or an existing app, you’ll need to do a git pull on your droplet to grab those changes and display them in your server. That’s it, it’s pretty convenient in my opinion.
As mentioned previously, Shiny Server can also be used as a great tool to host interactive Rmarkdown documents (not just shiny apps), so you can use this method to publish your rmarkdown files.
Note 8.3: Shiny Server Open Source vs Shiny Server Pro
In this tutorial we installed Shiny Server Open Source, which is a free offering of Shiny Server by RStudio. However, RStudio also provides Shiny Server Pro, which is not free but is a lot more powerful.
If you’re just an individual playing around with shiny and want to host some of your personal apps, then using the Open Source version is perfectly fine. But if you’re looking to use a shiny server in your company, or if you require some more features such as user authentication (login), scaling (supporting multiple users at the same time), and monitoring, then I highly suggest you take a look at at Shiny Server Pro.
If you’re considering purchasing Shiny Server Pro, RStudio Connect, shinyapps.io, or any other RStudio product, or if you want to discuss their benefits, feel free to contact me.
Note 8.4: Hosting R Markdown (Rmd) documents on your Shiny Server
Shiny Server is useful not only for hosting Shiny applications, but also for hosting R markdown (Rmd) documents. These R markdown documents can either be regular plain R markdown docs, or interactive Rmarkdown documents.
If you place an Rmarkdown file with the exact name of index.Rmd in any folder under your shiny server, you can access it by going to that folder’s URL. For example, /srv/shiny-server/hello/index.Rmd would be accessible at http://123.456.1.2:3838/hello/. If your Rmd document has any other name then you will need to specify the exact path to it - for example, /srv/shiny-server/hello/world.Rmd would be shown at http://123.456.1.2:3838/hello/world.Rmd.
Step 9: Make pretty URLs for RStudio Server and Shiny Server
This is optional and a little more advanced. You might have noticed that to access both RStudio and Shiny Server, you have to remember weird port numbers (:8787 and :3838). Not only is it hard and ugly to remember, but some workplace environments often block access to those ports, which means that many people/places won’t be able to access these pages. The solution is to use a reverse proxy, so that nginx will listen on port 80 (default HTTP port) at the URL /shiny and will internally redirect that to port 3838. Same for RStudio - we can have nginx listen at /rstudio and redirect it to port 8787. This is why my Shiny apps can be reached at daattali.com/shiny/ which is an easy URL to type.
You need to edit the nginx config file /etc/nginx/sites-enabled/default:
sudo nano /etc/nginx/sites-enabled/default
(I’m assuming you know how to use nano. If not, then just Google for “how to edit a file with nano”. In short: use the arrow keys to move aroud, press Ctrl+O followed by Enter to save, and press Ctrl+X to exit.)
Add the following lines above the line that reads server {
map $http_upgrade $connection_upgrade {
  default upgrade;
  ''      close;
}
And add the following lines right after the line that reads server_name _;
location /shiny/ {
  proxy_pass http://127.0.0.1:3838/;
  proxy_http_version 1.1;
  proxy_set_header Upgrade $http_upgrade;
  proxy_set_header Connection $connection_upgrade;
  rewrite ^(/shiny/[^/]+)$ $1/ permanent;
}

location /rstudio/ {
  proxy_pass http://127.0.0.1:8787/;
  proxy_http_version 1.1;
  proxy_set_header Upgrade $http_upgrade;
  proxy_set_header Connection $connection_upgrade;
}
(Note that some of these configuration lines I had to figure out on my own, and I’d like to reiterate that I’m an nginx noob so it might not be a correct solution. But it seems to have worked for over 1,000 people for a few years already, so that does give me confidence in these settings!)
Since we changed the nginx config, we need to restart nginx for it to take effect.
sudo service nginx restart
Now you should be able to go to http://123.456.1.2/shiny/ or http://123.456.1.2/rstudio/. Much better!
Step 10: Custom domain name
If you have a custom domain that you want to host your droplet on, that’s not too hard to set up. For example, my main droplet’s IP is 198.199.117.12, but I also purchased the domain daattali.com so that it would be able to host my droplet with a much simpler URL. I used Namecheap to buy my domain, but most companies are fairly similar.
After purchasing your own domain, there are two steps involved to link the domain to your droplet: you need to point from your registrar to DO, and to configure your domain on DO.
I used to give out specific instructions on how to do this, but unfortunately the steps keep changing every few months, so instead I’ll link to the two articles that will guide you through this process: Step 1: Point your registrar to DO and Step 2: Configure your domain on DO. You might need to do some extra Googling because the tutorials for this are not always super clear.
And that’s it! Now you have a nicely configured private web server with your very own RStudio and Shiny Server, and you can do anything else you’d like on it.
If you’ve found this tutorial useful, please consider supporting me for the countless hours I’ve put into this tutorial :)
Updates
[2015-05-11] I’ve gotten several people asking me if this can be a solution for hosting rmarkdown files as well. YES it can! Shiny Server works great as hosting .Rmd files, and you can even embed a Shiny app inside the Rmd file. Here’s an example on my server in case you’re curious.
[2015-05-11] There is some inquiry about whether or not this setup should be “Dockerized” (What is Docker?). Docker is of course a great alternative to setting this up and can be even simpler by taking away all the pain of doing the setup yourself and providing you with a container that already has RStudio/Shiny Server installed. Dirk Eddelbuettel and Carl Boettiger already did a fantastic job of making some R-related docker containers, including RStudio and Shiny Server, so check out Rocker if you want to go that route. I think it’s nice to do all this installation yourself because it can look scary and intimidating before you do it the first time, and it can be a nice feeling to see that it’s actually very doable and really doesn’t take very long (less than half an hour) if you have a guide that takes away the annoying Googling at every step. But you can quickly surpass all these steps and use docker if you prefer :)
[2015-05-12] Added missing dependencies to install devtools and Important note re: installing R packages.
[2015-05-13] Added section about populating Shiny Server with Shiny apps using a git repository.
[2015-05-13] Added a bit in step 9 about proxying WebSockets to fix a few small potential issues with RStudio Server.
[2015-05-14] Added section about setting up proper user permissions on Shiny Server.
[2015-05-18] As mentioned in the comments, students with an educational GitHub account can get $100 credits through the GitHub Student Developer Pack.
[2015-09-01] Matthew Lincoln posted a script in the comments section that runs all the commands in this tutorial automatically when a DigitalOcean droplet is initialized. His exact comment: “I’ve tried my hand at getting most of this scripted into a cloud-config file that you can paste into the ‘User Data’ section when starting up a DO droplet… It doesn’t handle anything like custom user options (yet!), but I’ve found it a great way to automate a fair number of these steps.” I myself haven’t tried his script, but you can check it out here, and I also found a DigitalOcean tutorial about cloud-config and User Data here. Again, I haven’t tried it myself so if you have any questions, please direct it at Matthew :)
[2015-12-05] Added a small paragraph to step 9 for fixing Shiny app URLs that don’t have a trailing slash.
[2016-03-10] There was an article today about how to add authentication to Shiny Server using nginx. I haven’t tried it, but it looks like a great resource if you want to add authentication to your apps.
[2016-10-09] Added a small section on Shiny Server Pro.
[2017-04-04] Added a section on hosting Rmd files on a shiny server.
[2017-10-17] Updated instructions to use Ubuntu 16.04 instead of 14.04 and changed using vim to using nano because it’s easier for beginners. Also updated the “custom domain name” section because the specific details kept changing all the time.
[2018] I’m going to stop mentioning all the updates. I’ll just update the article whenever it needs to happen.
Resources
This is a list of the main blog/StackOverflow/random posts I had to consult while getting all this to work.
- DigitalOcean: ssh keys
- Nginx
- Installing R on Ubuntu
- StackOverflow: adding swap space
- StackOverflow: installing devtools
- DigitalOcean: set up RStudio
- RStudio Server
- Shiny Server on DigitalOcean
- DigitalOcean: custom domains 1
- DigitalOcean: custom domains 2
Disclaimer
I’m not a sysadmin and a lot of this stuff was learned very quickly from random Googling, so it’s very possible that some steps here are not the very best way of performing some tasks. If anyone has any comments on anything in this document, I’d love to hear about it!